
I love Thrift Stores because I always find some very interesting pieces of furniture there. Last month I found this corner hutch.

I have been wanting a hutch for a while, and this one was super cute and the style I was looking for... The only thing I hated was the color. So for $75 bucks I bought this very heavy hutch and brought it home to turn it into something I would truly love. Here's how:
Step 1: Prime
I bought the Valspar Multi-Purpose Primer for this. Before priming, you want to make sure the surface is clean and smooth. Luckily I did not have to sand this piece. But if you have rough areas, you might want to sand it first. After you prime, it will
look like this:

Depending on the color on the original piece, you might want to use two coats. Since my hutch was a very dark blue, I used two coats to make sure there was no color bleeding through the new paint.
Step 2: Paint
For the outside paint, I used Valspar Semi-Gloss Finish in the Dogwood Petal color. It came out pretty nice and not too white. For the inside, I used Olympic Semi-Floss Finish in the color Two To Tango. Now, make sure you separate any borders with painters tape.
Step 3: Hardware
I changed the knobs of the doors to add more personality to the piece. I bought mine at Anthropologie and they are called Sunflower medallion.

Step 4: Decorate
Now, this is the fun part. You can color coordinate the items with your already existing decor or go monochrome. I chose to coordinate with the colors of my dining area and living area - blue and orange.
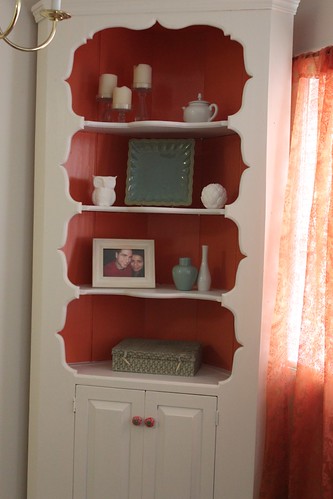
I also made a painting to go with the whole set using some of the paint I bought for the hutch and some paint I had laying around:

And here is the final result:

I'm pretty happy with the results so far. I might put a wallpaper on the background of the hutch in the future once I get tired of it, but for now, I'm pretty satisfied :)
xoxo
