Wednesday, November 30, 2011

My Favorite Scented Candles This Season

I have an addiction for candles, but I'm also very picky when it comes to scents. Today I will show you my favorite candles for winter season as well as the Holidays, which are currently burning (quite literally) in my apartment. 


1. Sparkling Snow by Yankee Candle


I love the scent of this candle. It is that "Just Out of the Shower" kind of smell, very fresh and citric. Definitely a Christmas scent. It's also very strong.

Manufacturer Description: The crisp, naturally fresh scent of gleaming, snow-covered pines with hints of patchouli and fruit.  

Price: $14.99 at yankeecandle.com


2. Winter Solstice by WoodWick Gallerie Collection


First of all, what an adorable tin container! I really just bought for that reason at first, but I really liked the minty smell and the sound of the crackling fire once it started burning. 

Manufacturer Description: The scents of frozen icicles and sparkling snow with notes of mint and lavender

Price: $14.95 at Everythingsmells.com

3. Winter Cabin by Slatkin & Co


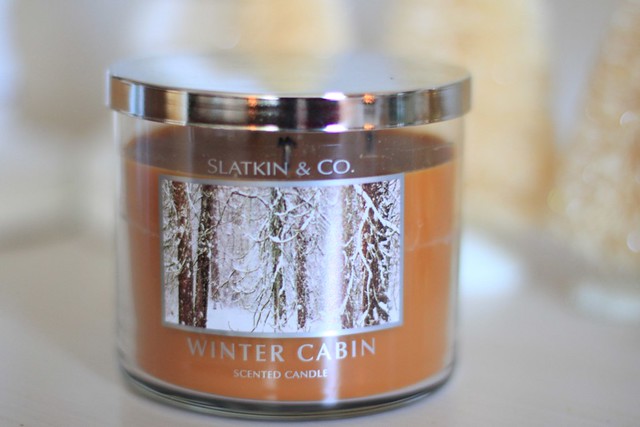
I LOVE Slatkin & Co candles... They are super strong and you just need to burn them a few minutes before your whole place smells good. This one in particular is very wintery and Christmassy. 

Manufacturer Description: Like a secret holiday getaway - a warm, comforting blend of creamy chestnut, crisp cedar and pine, infused with cinnamon and spicy cloves

Price: $19.50 at bathandbodyworks.com

4. Sparkling Cinnamon by Yankee Candle QuickScent


I actually got this pretty burner with the candles at Hallmark, and it came with a cozy red fleece blanket with white snow flakes pattern. I love the blanket and I like the candle. It is not one of my favorites, but I like the look of it and if you are a cinnamon fan, which I'm not, you will love the smell. And you can always by new refills with a different scent.  

Manufacturer description: The warm holiday glow of cinnamon stick and a hint of clove. 

Price: $30 at Hallmark Stores (includes the blanket and refills)

5. Fireside by Slatkin & Co


This one has got to be my favorite for this season..It really DOES smell like a fireside. I simply love it! And sandalwood is one of my favorite smells, so this one for me is win. 

Manufacturer Description: A blazing fire in wintertime, this blend of cedar and sandalwood is layered with leather and the richness of amber.

Price: $19.50 at bathandbodyworks.com

***

I hope you have nice smelling holidays!

xoxo


Monday, November 28, 2011

INSTAGRAM COASTERS DIY


I was browsing through some ideas online of printing pictures and adding them to canvas using ModPodge, and at the same time, browsing through my Instagram. It then clicked, why not print my Instagrams pictures instead? The only problem was I didn't have any blank canvas laying around, especially one small enough for the 4x4 resolution Instagram pictures. But then I remembered I had tiles! I had bought them for a few cents at Home Depot to make some coasters using scrapbook paper, but had not yet found a scrapbook paper I really liked for coasters. 

So then I decided, how cool would it be to make coasters using my Instagram pictures??

I went to Inkstagram , which is a very cool website where you can access your Instagram from your computer. I then went to my feed and right clicked on the pictures I wanted to print for the coasters. I then copied them and pasted them into Photoshop. From there I printed the size I wanted (4.12in x 4.12in) which was the size of the tile. 


I then brushed ModPodge Matte onto the tile and carefully applied the picture on the tile, smoothing over any wrinkles. 


Once it completely dries, I applied another layer of ModPodge on top to seal it. Now, this is the first time I have done this, but I've read in other websites that it's best to add three coats of mod podge on top to really protect the picture. Once that was dry, I applied DuraClear Varnish on top.


Lastly, I put some Felt Pads on the bottom of the tiles to keep them from scratching any surfaces. 


And there you have it! Instagram Coasters! :)


To see more of my Instagram pictures, you can find me as @Allthingswhimsical :)

xoxo


Friday, November 25, 2011

JEWELRY ORGANIZER DIY

Happy Black Friday everyone! I not only bought a few new things today, but I also worked on something old and made it new. 

I had gone to the Bryn Athyn Thrift Shop earlier this week and found a few interesting things, including the below basket for $3 and jars for $1.50 each. 


 Not bad! I have plans for this, but not until after the Holidays. 

Well, I also found this wall picture frame that had some hooks on it and missing others, for only $2.


I knew exactly what I wanted to do with it when I saw it.

The next day I stopped by Target and bought some knobs. That was definitely the priciest part, since it cost me about $30 for all the knobs ($14.50 for a pack with 4) , but definitely worth it. 

So today after Black Friday Shopping I decided to work on this little project to keep me awake. 

The Transformation Process

First, let me apologize for not taking pictures of the entire process, but I'll try to describe as well as possible. 

First, I covered the holes with wood filler, sanded them down (even though you are really supposed to wait 8 hours but I have no patience and the holes were really small) and wiped the dust off. 

I then added two coats of Valspar Semi-Gloss Turquoise Tint (no primer) that I already had at home. I should probably have added a primer first, but again, I was being lazy.  

After that I dried it with a blow drier (did I mention I'm really inpatient?) and after the paint was dry I sanded a few areas on the edges and brushed antique glaze on top to add the rustic feel. 

I then drilled new hole for the knobs, screwed the knobs in and added some pretty yellow decorative paper in the frames which goes with my Guest Room colors (yellow and blue).

And here's the result: 


And that's how I got myself a brand new jewelry organizer!

If you want to check more ideas for jewelry organizers using knobs, I recommend going to Pinterest. They have lots of very cute ideas and that's how I got the knob jewelry organizer idea as well.

And for those of you who like a Before & After picture, here it is:


xoxo


Wednesday, November 23, 2011

An Inspiring Craft Table


I've been wanting a desk for my crafts that would also be big enough for sewing. I found this big desk below at a Thrift Store and bought it for $10. It was kind of an eye sore and not at all inspiring but I had plans for it :)


It had been siting in my guest/craft room for about a month and today I finally had the time to work on it.

So I started with two coats of Primer. I usually don't sand because the Primer pretty much does the job. I used this one:


Here's the work in progress: 


As you can see, when you add the first coat of primer, it doesn't look good at all. But after the second coat you start getting an even color.

After adding two coats of primer with a roller brush, I added one coat of white paint with a regular paint brush  as well as painted the handles with Aqua Pearl paint medium by Martha Stewart.


I then applied a top coat to protect the finish and that's it! In less than 3 hours I got myself a pretty Inspiring craft table!!  :)


Can't wait to start crafting!

xoxo


Monday, November 21, 2011

DIY STAR TREE TOPPER Explained


Okay, so a lot of you have been requesting instructions on the Star Tree Topper. So this evening I sat down, and not only took lots of pictures of the process but also created new ready to print templates for you guys. 

So here you go.


  Materials you will need: 

- Cardstock Paper
- Hot glue gun
- Scissors 
- Color Printer
- Glitter Spray (Optional)

Instructions: 

Step 1 - Start by downloading the templates for the tips of your star. You can download the blank template if you want to add your own pattern on them using Photoshop or if you want to print in a decorative cardstock paper, or you can download the ready to print templates with patterns on them if you have a color printer.


Step 2 - Print your templates on cardstock paper. You will need 5 of them for the tips of the star. 


Step 3 - Cut and fold the templates. You will cut them on the straight lines and fold on the dotted lines. 


Step 4 - Glue the sides of the tips creating a cone shape. 


You will end up with 5 cones like these. 


Step 5 - This is the most tricky part. At the bottom of your cones, you will see the folded edges which you will need to attach to the edges of the other tip with the hot glue. You will glue the bottom right side of a tip to the bottom left side of the other. You will end up with something like this: 


Do the same with all of them until you have all 5 tips glued together. You can leave a hole at the bottom where you will attach to the tree, by not glueing the sides together (like the one in the picture below). But if you want a closed star, just press the middle down to flatten the star a bit, so that the bottom sides meet and you can glue them to each other. 


And that is it!! You are done making your star!

I added some Glitter Spray to mine to make it shiny. You can also poke holes in them and add lights inside. 


I hope this was helpful. If you make one, I would love to see pictures! 

xoxo


Friday, November 18, 2011