Friday, September 30, 2011

CHARMING LITTLE COTTAGE


I literally stumbled upon this article at Sharona Design website, about a tiny cottage designed by Sandra Foster. Any little girl (or grown woman) looking at these pictures would dream of having something like it as their tree house. Isn't that just the little house of your dreams?


xoxo


CLOCK AND CAMEOS


I know I probably said this before, but I consider myself very lucky for having a husband who works at a Thrift Store. I can't count how many times I've seen furniture at his store I wanted to re-purpose, but unfortunately, at least for now, I can't buy every single one due to the sheer fact I would not have a place where to store them. I keep telling myself, once we buy a house that has a garage, that will be my storage/DIY space. I just can't wait. 

Anyway, back to my findings of the week. 

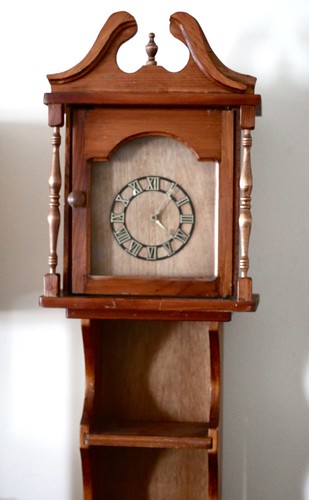
I found this clock that looks somewhat handmade. But something about it screams "PICK ME! SAVE ME!". I didn't buy it the first say I saw it, but I told myself if I went there and it was still at the store, I would get it, if of course was reasonably priced. Turns out I went back and there it was, sitting at the corner all sad and left out. And the best of all, it was just priced at $5. I bought instantly and asked by hubby to load it in our SUV. Now it still in my living room, waiting for its makeover. I still haven't decided what I'm going to do with it thought. I definitely have plans to give it some attention sometime in October :)

My second find were these very cute Cameos. I don't know why but all of a sudden I started with this Cameo obsession. I'm starting a collections. They are not real, but still adorable! I found them also at by husband's store. 


I'm definitely going to be adding pictures of these to my Instagram account. 

xoxo

Wednesday, September 28, 2011

DIY EMBOSSED PAPER


I love the look of embossed paper, and I found a very cool tutorial on how to do it yourself at Food Wine and Mod Page. I wish I had know this before I got married and made my own invitations. It's so easy!!!


They look stunning and Katie P gives a very nice tutorial as well as list of tools you will need on her page.

For the full tutorial, click here.

xoxo

CONNIE'S DRESSER


This is by far one of favorite Repurposing jobs I've seen online. Connie did a wonderful job and turned what was a very ugly old piece of furniture into a beautiful, stylish and chic dresser.

Here's the before:


Isn't that amazing? For the full post about this makeover, visit her blog.

xoxo

WHIMSICAL CUPCAKES


Nothing like adding some fun to baking! I love decorating and designing, but I also love eating and baking, so I added the best of both worlds to making these fun looking cupcakes. 

For the actual cupcakes, I just used cake mix, but for the fondant, I used the recipe I found at All Recipes, right here. What I liked about this recipe is that it is very easy and simple to make. 

After the fondant was ready, I added red food coloring and kneaded it into the fondant until I achieved a light pink. After the fondant was ready, I then molded it on top of the cupcakes and then used my imagination for the decorations. 


So yep, this was my try at cupcake with fondant. Definitely fun!

xoxo

Tuesday, September 27, 2011

SILHOUETTE WALL ART

Here's a quick way to make art for your walls: Print and cut!

That's what I did for our dining/living room wall art... I printed different patterns into 8x11 paper and then printed silhouette of kitchen utensils which I then cut and pasted on top of the patterns.


Easy and cute :)

You can find the silhouettes for free download here, but it's only for personal use.

Enjoy!

xoxo

DIY RAINBOW ART


So I decided to try my hand at the "Melted Rainbow Art" (originally created by artist Jessica Kerbawy ) that I had seen online and added my own "twist". It's a very easy and fun way to make your own art. 

All you need is a canvas, crayons, a hair dryer, tape and if you want to get adventurous, paint and brush. 

I started by taping all the crayons on top of the canvas coordinating as much as I could by the color of the rainbow.

Then I propped the canvas against the wall and on top of plastic so that it wouldn't get the floor messy, set my blow dryer to low and started "blow drying" it. The wax will start to melt and create a very cool effect. 

I then took the crayons out of the top and instead painted a blue strip once the wax dried and drizzled white paint over with. 


And Voila! You have created your own masterpiece ;)


I think it would look especially cute at a children's room or a Craft room. 

xoxo

Sunday, September 25, 2011

MY IPHONE ADDICTION

All Things Whimsical


So I created this for my Instagram profile using Polyvore. Yep, I'm addicted to that App!! I have stayed up late many nights just browsing through other people's pictures or posting my own. If you want to check out my pictures, just look for Allthingswhimsical.

xoxo


Wednesday, September 21, 2011

A HUTCH MAKEOVER


I love Thrift Stores because I always find some very interesting pieces of furniture there. Last month I found this corner hutch.


I have been wanting a hutch for a while, and this one was super cute and the style I was looking for... The only thing I hated was the color. So for $75 bucks I bought this very heavy hutch and brought it home to turn it into something I would truly love. Here's how:

Step 1: Prime

I bought the Valspar Multi-Purpose Primer for this. Before priming, you want to make sure the surface is clean and smooth. Luckily I did not have to sand this piece. But if you have rough areas, you might want to sand it first. After you prime, it will
look like this:


Depending on the color on the original piece, you might want to use two coats. Since my hutch was a very dark blue, I used two coats to make sure there was no color bleeding through the new paint.


Step 2: Paint

For the outside paint, I used Valspar Semi-Gloss Finish in the Dogwood Petal color. It came out pretty nice and not too white. For the inside, I used Olympic Semi-Floss Finish in the color Two To Tango. Now, make sure you separate any borders with painters tape.

Step 3: Hardware


I changed the knobs of the doors to add more personality to the piece. I bought mine at Anthropologie and they are called Sunflower medallion.


Step 4: Decorate


Now, this is the fun part. You can color coordinate the items with your already existing decor or go monochrome. I chose to coordinate with the colors of my dining area and living area - blue and orange.


I also made a painting to go with the whole set using some of the paint I bought for the hutch and some paint I had laying around:

IMG_0379

And here is the final result:


I'm pretty happy with the results so far. I might put a wallpaper on the background of the hutch in the future once I get tired of it, but for now, I'm pretty satisfied :)

xoxo


TIFFANY'S INSPIRED CUPCAKES


So in my last post, I talked about the invitations I made for my best friend's bridal shower. Here you will see the favors I also made.

I wanted something that matched the colors of her wedding and at the same time was original. I knew I wanted to make cupcakes, but I wasn't quite sure how to present. After
browsing the internet for quite sometimes, I found the "Tiffany's Box" idea.

What I did is I bought plain boxes and favor rings at Michaels, as well
as blue paper (the closes to the Tiffany's blue I could find), then printed their names in a similar Tiffany's font onto the blue paper. I then glued the paper around the boxes, tied a white ribbon around it and put the cupcakes inside. Here's how the cupcake looked:


Photos by Joy Feerrar


Everyone simply loved them. Just make sure the guests don't eat the ring by accident! :)

Oh and by the way, it's a cute way to propose too!

xoxo


DIY BRIDAL SHOWER INVITATIONS


It's been a while since I last posted here, but that does not mean I haven't been inspired in these last months. So let's catch up, shall we?


I will start with a Bridal Shower invitation I did for my best friend's shower.


I made the design using Photoshop and the pattern I downloaded from a design website. If you google "envelope pattern" you can find many different sizes.
Instead of using boring white envelopes, I decided to print a template with the same pattern matching the invitation, cut and fold them.


It was a lot of work, especially because each one of them had customized addresses so I had to print one by one.

I printed the invitation on a pearl metallic cardstock paper. By the way, I highly recommend www.paperandmore.com. Their prices are great, they ship fast and customer service is wonderful.


invitation2

I received many compliments with these invitations. They were definitely worth all the work!

xoxo